It’s interesting to see what you can scratch build using basic materials and a scale rule. The timber stacking shelves and swings was made using match sticks and balsa sheet. I also used fine paper clips for the metal parts of the swings. I am very happy with the timber stacks but feel I could improve the swings.
Scratch build swings and timber storage shelves.Timber lumber supplies starting to take shape.Fun at the park (foam is holding a place for milk bar and butchers)Oh the Jacaranda trees
This was an interesting activity to have a go at, with one unforeseen side issue. After I had completed this, I later realised that I was going to undertake an extension to the layout, which meant I not longer had a place for the new turnout on the track plan. But I found that using Train Controller software that a new track plan could easily updated and changed to suit my system. I have since done a couple of other changes to my layout that can be incorporated as well. (Still have one more change to go) The train controller software uses Hot Keys to toggle the turnouts (as well as clicking on the turnout) and you get a visual of the computer monitor to show turnout position. I find this very good, but it is also very handy to have the old system as it can be used when I don’t have the computer on.
Push button track plan turnout indicator and switch.Lots of wires to hookup to get the circuit board working, but we’ll worth the effort and rewarding after it was finished.Train Controller track plan. The labels inside the track plan are manual driving routes for automatic and manual driving together.
Creating a great looking scene is both fun and challenging, it takes lots of little touches which tell a little story of what is actually happening as the photo was taken so to speak. Trying to visual the scene in advance is really important, what is the little story that is going on in this scene, a discussion about where a box is going to be placed or someone watching another person working. Have a look at a similar scene in real life, examine all the little details that go make it a real scene. Composing a scale scene to be as real looking, requires trying to get as many of the details into your scene as you can.
It’s amazing how bringing a few details together even painting the backdrop sky blue goes to making a scene.
Adding layout details was an exciting but scary thing to do, especially the first time I did things. Like the first attempt at static grass, making a rock overhang, tunnel entrances or the road way. I really didn’t want to end up with a layout that looked awful and I didn’t expect professional results. However, I am very happy with the results that have been achieved, far higher that I had expected.
The town scene shows static grass in the park area, road waytunnel entrances rock face water tower and tree.
When planning out were I was going to put things around the layout, I used coloured paper scaled to the chosen kit footprint of the building. I used blue tac to hold in position, where I just looked at the layout proposal over the next week or so and adjusted positions as I visualised the full model. I did sometimes also cut a piece of foam and place over the piece of paper to give me a 3D look if I wasn’t sure of how it might look.
Photo shows coloured fill in cuttings and two plywood areas for stations as well as cut out for a water feature.
This lumber yard was my first attempt at a scratch built building. I firstly cut lengths of pine to scaled timbers. I drew a scaled portal frame and made 6 frames. I decided to glue these to a plywood base for ease of positioning later which was a good move. Then I glued the roof rafters and floor in position and carefully laid the strips for the roof. (I left one side of the roof open to allow the saw mill to be seen). I then placed the two LEDs into positioned and hid the wires. Weathering of the timber work was then completed. At this stage I began to install details inside the building- mill, logs, timber stacks and strips.
Scratchs built lumber yard taking shape. Still a lot of details to be added.
This is my new loco the Walthers Plymouth ML-8 switcher. I am in the process of detailing it to look like a Tully Sugar Mill Loco. While the scale is correct for the loco it is not the correct gauge (should be 9mm not 16.5) but anyway I wanted to have this look on my layout pulling a few sugar cane bins around. I am very happy with the look so far.
My new Loco Walthers Plymouth
Picture of what I am looking for from my loco
Loco has been painted, still have to detail for the diesel motor.
Now to start on modeling some building. I have mostly been using kits from model train buildings in Australia. https://modeltrainbuildings.com.au/ I have found these kits easy to construct and look great, best of all they are iconic building from Australia. This kit I used on my layout at Pine Tree Station is actually from Wacol Station. I have used 3.5mm plywood for the platform which still needs to be completed in this photo.
This scene is still a work in progress, but the building is ready to be positioned and glued down.
Taking a looping track that represents a linear track plan with stations at opposite ends requires careful planning. When it came time to introduce the roadways my new roads also needed to model this same concept. I used woodland scenics paving tape to act as boxing while I poured the plaster and used the paving tape to screed the plaster to form the road. Then peal off the tape when the plaster is set. Provided you get everything ready in advance ( smoothing, correct spacing and parallel tape, the end result looks really good especially after you give the road surface a light sand with a fine sanding block to make the road surface uniform.
The planned roadways were outlined using black insulation tape so lines could be easily adjusted until the final shape appeared, Then the lines could be out line and made ready to pour the roads.Road was painted grey, black marker was used to detail road crack and a white marker for road lines accurately drawn.
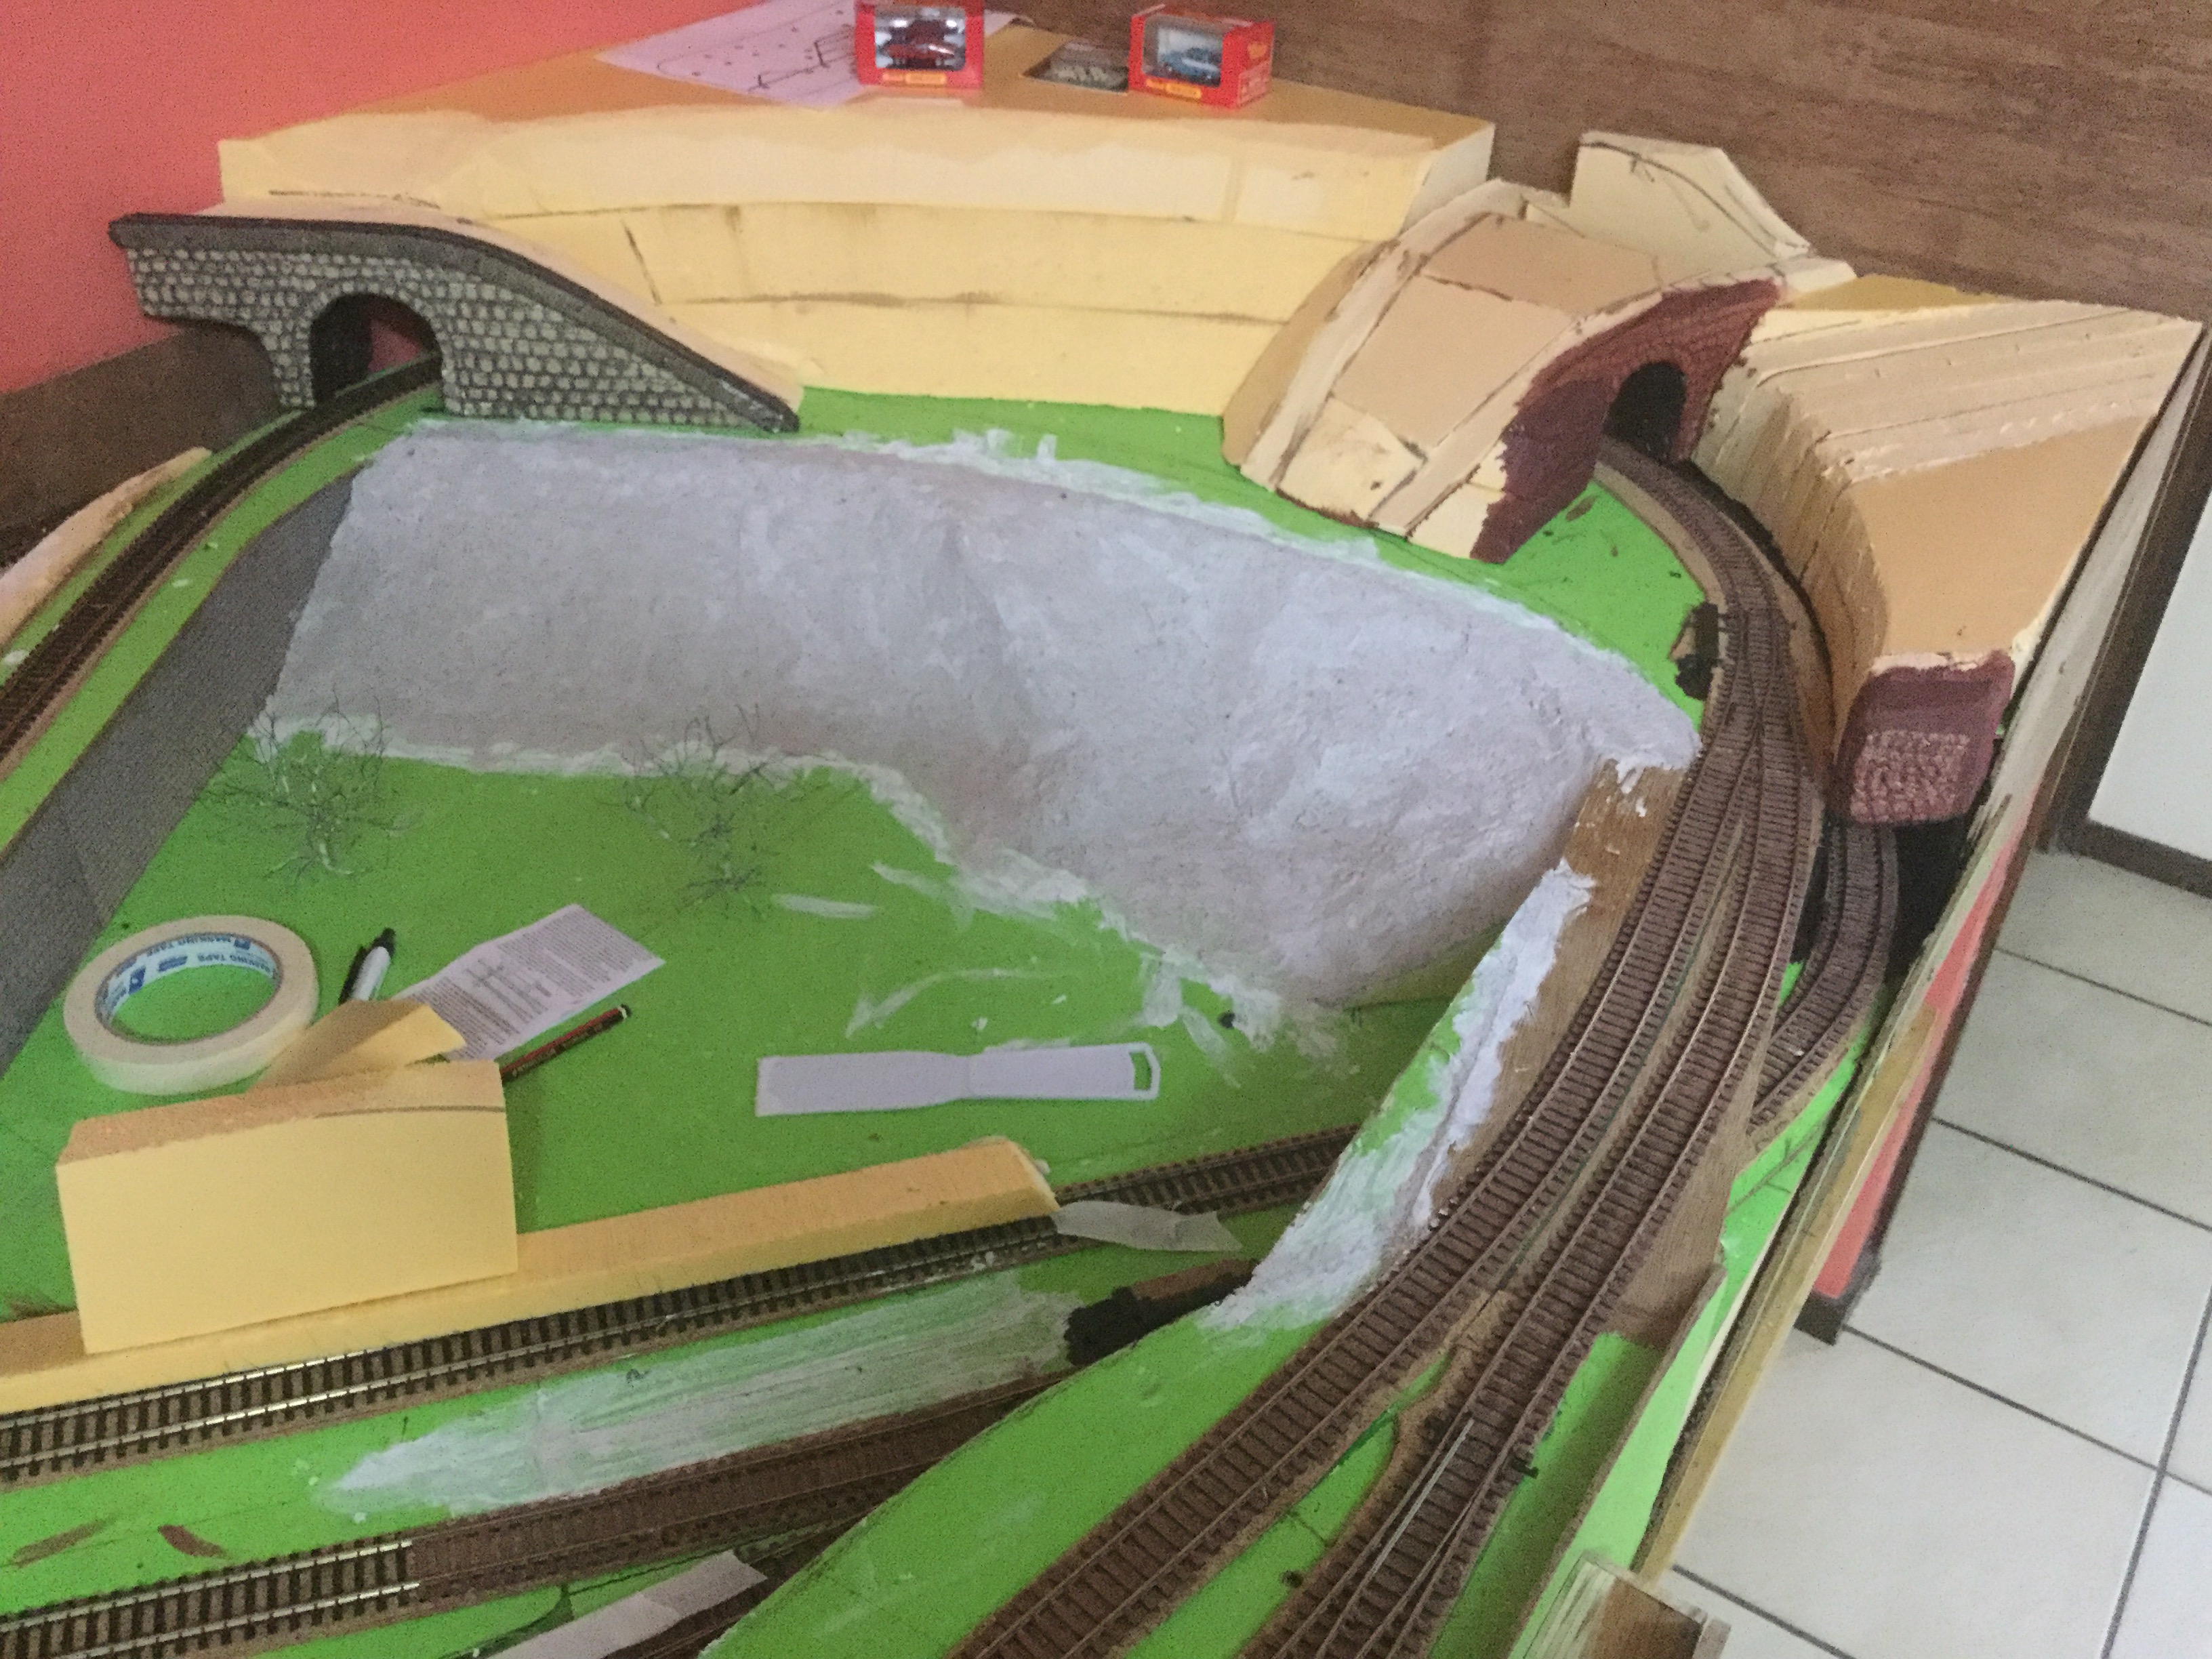
Well this was a challenge, to work out exactly how to fill in the gaps between levels especially when they at 2 different angles. I thought long and hard how to achieve this, in the end I used my table saw to cut expanded foam to the taper between the levels, which ended up about 10mm thick. This made it thin enough to bend around the corners and then I scribed the second gradient angle, which was very easy to trim to shape. I carefully used construction glue to hold these in place. When that was dry I used a product called “Sculpt-It Modelling Mix” (from Office works) to fill the foam pores, edges and shape to the desired profile. Turned out far better Thani anticipated.
Filling between levels using expanded foam.Sculpt-It Modelling Mix Used to fill foam and shape.At the other end I used expanded foam to create a small hill and tunnel scene.The two tunnel entrances were expanded foam which were embossed with a pencil to give the brick shape , then painted and given a dark wash.
In working out my track plan, I was constrained by the available space that I could use for my model railway. I have a space 3000mm x 1100. Really not enough room apart from a shunting layout. So it was decided to make a looping track as shown in picture one ( I do enjoy watching the trains go by) Picture two shows how I really view my Railway even though it is a loop. Jacaranda Junction (block 7) and Pine Tree (block 4) appear close on the looping track, but are in fact they are very far apart (see linear track plan) when driving trains around the loop it has to be realised and remembered that you cannot take a short drive from Jacaranda Junction to Pine Tree Station but instead driving a full loop to achieve the destination. However when shunting the centre siding can be used by either Station.
This was my initial track plan which has been added to include a dock and logs pick up and a fold down staging yard. Note the blocks shown are not correct.
These two track plans show the progress of the layout. The first picture shows my original layout and the second shows the addition of the line to the docks and the logs pick up area. Photo 3 is the train controller picture that shows a small staging yard and a line that goes behind the backdrop onto a fold down bench which will at a latter date join into a hidden section (yet to be constructed) so the train can go into the tunnel and vanish so to speak.
This is my linear track plan of my looping track
This track plan shows the layout as it is today with a line going behind the backdrop.